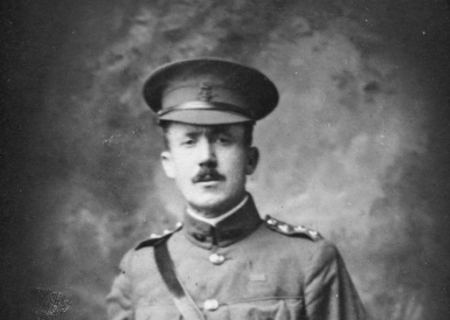
At about 8 p.m. on 25 April, Brigadier General Harold ‘Hooky’ Walker ordered Jesse Wallingford to guide two newly arrived companies of the Canterbury Battalion up a spur which quickly became known as Walker’s Ridge. This ridge, on the left flank of the Anzac beachhead, led up to a long, narrow plateau running southwest that later became known as Russell’s Top. If these positions were lost, the beachhead would become untenable.
When he reached the base of Walker’s Ridge, Wallingford discovered that Lieutenant Colonel George Braund, the commanding officer of the 2nd Australian Battalion, who had been leading the defence of the area since the morning, had, along with most of his men, ‘evacuated the position’ and that the ‘whole of our left flank is exposed except for a small piquet near the sea’.
Wallingford decided that extraordinary steps were necessary and, in the darkness, impersonated Walker. He ordered the exhausted Braund to move back up the ridge, and at the same time encouraged him by explaining that he had brought substantial reinforcements, as well as desperately needed entrenching tools. Braund did as he was ordered, but Wallingford still had to go up the ridge, gathering men, until he reached Russell’s Top. Having posted men to secure the front line, Wallingford then sent 20 more to reinforce the piquet by the sea. Wallingford returned to Walker’s headquarters at about 3.30 a.m. and informed him that the flank was secure.
Wallingford decided that extraordinary steps were
necessary and, in the darkness, impersonated Walker.
The following day, Walker received a report that the troops on Walker’s Ridge lacked leaders and were badly disorganised. Wallingford volunteered to do what he could to stabilise the situation. On the ridge, he found a mob of exhausted men who were lying down, being picked off by snipers and not returning fire.
Wallingford could see that some men were slipping away. A degree of panic was caused by confusing and disturbing orders, and calls for stretcher bearers that were passed down the ridge. Wallingford called out that he was now in command, that no more alarming orders were to be shouted, that the wounded were to lie where they were, and that he would ‘blow out the brains of the next German spy that passed an order’.
Shortly afterwards a man in an Australian uniform ran down the ridge, calling on the Anzacs to retire as the Turks were attacking. Wallingford ‘could not see through the scrub so as to shoot him myself so hollered out “shoot that B— he must be a German”’. The man was then apparently shot.It was clear to Wallingford that his men would flee unless he took decisive action. He later recalled how he had been taught that ‘to advance is to win’, and quickly decided that a counter-charge was the best way to head off a crisis. He ordered his troops to ‘fix bayonets and let’s fight it out like men’, and then jumped to his feet and charged. Initially only a few men, perhaps two, followed him up the ridge, but others soon joined them. The Turks melted away in front of them, but they were met by a ‘dreadful fire; men going down all around’.
He ordered his troops to ‘fix bayonets and let’s fight it out like men’, and then jumped to his feet and charged . . . The Turks melted away in front of them, but they were met by a ‘dreadful fire; men going down all around’.
After advancing about 25 metres, Wallingford was surprised to come across two of the Wellington Battalion’s machine guns with their crews lying dead or wounded around them. With the assistance of one young gunner, Wallingford quickly repaired a machine gun and used it with great effect, beating off three frontal attacks by Ottoman troops as well as efforts to work around the flanks. In addition to inflicting many casualties with the machine gun, Wallingford used a rifle to dispatch several snipers. The renewed firing of the machine gun attracted the attention of men behind Wallingford and they filtered forward in ones and twos. By about 5 p.m., Wallingford had enough men to crew both machine guns and to properly hold his position. He then returned to Walker’s headquarters.
Wallingford’s courageous actions on Walker’s Ridge were vital to retaining an area of the utmost tactical importance. He was awarded the Military Cross, the citation for which stated: ‘On the 25th and 26th April, 1915, during operations near Gaba Tepe, for exceptionally good services with the New Zealand Brigade machine-gun and sharpshooters, and for conspicuous coolness and resource on several critical occasions.’
Wallingford’s courageous actions on Walker’s Ridge were vital to retaining an area of the utmost tactical importance.
Wallingford’s first thought when he learnt of the award was ‘what will Sid [his son Sidney] think of it and what will his school chums say when he goes to [Auckland] Grammar the morning it appears in the Herald’. Wallingford thought that he deserved a higher honour, telling his son that in half an hour on Walker’s Ridge he had ‘earned the DSO easily’.